Serial communication with the Tiny's
When you use the Arduino with the Arduino IDE, you are used to use Serial.print and the serial monitor, when you want to get some debug information. Something like this:
void setup() {

Serial.begin(9600);

}
void loop() {

      Serial.println("Testing..");

    }
If you are using one of the tiny's things are a bit different, but you also get more options.
In the following text I will assume you are using this core:
http://code.google.com/p/arduino-tiny/
There are several options to get the same functionality as you are used to in the Arduino environment.
1. TinyDebugSerial
1a. Leightweight Serial Output
1b. Tom Carpenters Tiny Serial
2. SoftwareSerial
3. Use TinyISP and Tinyknockbang
4. Use TinyISP and Serial Relay
5. Use TinyISP and Nullmodem
TinyDebugSerial
This option is TX only, that is you can send serial information from the tiny to your computer, and not the other way, but for debug information this is also usually what you want.
Using the sketch above your tiny will output on
Attiny85 - PIN PB3
Attiny2313 - PIN PD1
Attiny84 -PIN PB0
Note there is no difference in the code from the Arduino code, and no library's needed.
The above mentioned pins are for clock frequence 8 MHz or less (no x-tal)
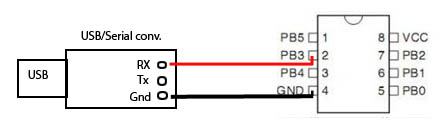
You can connect the Tiny to your computers USB using a USB/serial converter:
In this picture I use a cheap USB/Serial converter from Ebay:
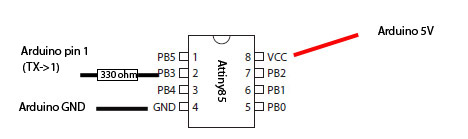
You can also use your Arduino as USB/serial converter: Connect a jumperwire from reset to ground on the Arduino, and connect the outputpin from the tiny (PB3 in the above picture) to TX (pin 1) on the arduino (labeled TX->1).
Be sure to connect the Grounds !
Just to be sure nothing bad happens to your Arduino you should first upload an empty sketch to the UNO, and connect a 220 ohms resistor between PB3 and TX.
Leightweight Serial Output
This library is developed by Ralph Doncaster, and are so small that you can use it on a ATtiny13
forum.arduino.cc/index.php?topic=207467.0
He has also made a half-duplex Serial library, that can be uses with just one pin for rx and tx.
http://nerdralph.blogspot.dk/2014/01/avr-half-duplex-software-uart.html
A quote from the Author:
Basically this gives you the advantage of Asyncronous Serial communication, but uses a clock line to time the bits allowing for full duplex
operation without the ATTiny having to time out the Serial baud rate. See Arduino forum
SoftwareSerial
If you use this option you have a two way communication, just as you are used to from the Arduino environment.
Below is an example using PIN PB3 as rx and PIN PB1 as tx. You can then connect these pins to the corresponding pins on your Serial/USB converter.
If you only need tx or rx you can set the unused option to -1, like this
const int rx=3;

const int tx=-1;
The disadvantage of using SoftawareSerial is that you might have to tune the internal oscillator to get a stable connection. Another thing is that it use more memory than TinyDebugSerial.
If you need to tune the internal oscillator you can use TinyTuner:
http://arduino.cc/forum/index.php/topic,8553.0.html
#include <SoftwareSerial.h>

  const int rx=3;

  const int tx=1;
SoftwareSerial mySerial(rx,tx);

  int i=0;

  char buf[12];
void setup()

  {

  pinMode(rx,INPUT);

  pinMode(tx,OUTPUT);

  mySerial.begin(9600);

  }


  void loop()

  {

  if (mySerial.available()>0){

  buf[i]= mySerial.read();

  if (int(buf[i])==13 || int(buf[i])==10 ){  //If Carriage return has been reached

  mySerial.println(buf);

  for(int x=0;x<=10;x++){

  buf[x]=' ';

  }

  i=0;  //start over again


  } //if enter

  i++;

  } //If mySerial.available

  }//LOOP
Options 3-4 Using TinyISP
An obvious disadvantage of the previous options is that you have to connect a programmer, then disconnect the programmer and connect a serial/usb converter to see the results. And if you want to make som changes to the code, you have to do all this again.
Luckily Coding Badly has made a solution for this called TinyISP.
This is a replacement for the ArduinoISP, that you normally use, and if you use it you can leave all the wiring as it is and still get your debuginformation from the tiny. When you use it you will feel almost no difference from using Arduino.
Download TinyISP here: https://github.com/Coding-Badly/TinyISP Make a folder called TinyISP in your sketch folder, and put all the files in this folder. Open the TinyISP.pde in your Arduino IDE
TinyISP and Knock-Bang
This is one way communication, like TinyDebugSerial, but as mentioned with the big difference that you don't have to wory abaut serial/usb converter.
Quote from the Author: Advantage: Reliable over the entire range of factory tuning of the internal oscillator. Faster, smaller, and more efficient than Software Serial. Disadvantage: Does not work with other serial devices. Requires the use of TinyISP (ArduinoISP derivative) (could also be considered and advantage).
Example sketch:
#include <TinyDebugKnockBang.h>


  void setup( void )

  {

  Debug.begin( 250000 );

  }


  void loop( void )

  {

  Debug.println("Test knock-bang");

  delay( 1000 );

  }
Setting it up:
Download the TinydebugKnockBang library, and put it where your userlibrary's is located.
In the TinyISP sketch navigate to _TinyISP_BuildOption.h and copy this line
#define RELAY_KNOCK_BANG_ENABLED 1
Here is how it should look
To use it open the serial monitor
• Ensure 19200 baud is selected• Enter a single exclamation mark (!) and click Send
• The following line is output by the Arduino...
--- Monitor starting ---
• Enter a single exclamation mark (!) and click Send
• The following line is output by the Arduino...
--- Monitor stopped ---
Other commands to use:
@ Toggle between holding the target in reset after programming and allowing the target to run immediately
# Reset the target now or allow the target to run if it is held in reset
$ Hold the target in reset
TinyISP and Serial Relay
Transmit on Arduino is pin A0
#include <SoftwareSerial.h>

  // Attiny84 and TinyISP Serial Relay
const int rx=1; //receive pin on attiny pic any

  const int tx=5; //MISO on attiny is also tx
SoftwareSerial mySerial(rx, tx);

  void setup() {

  mySerial.begin(9600);

  }
void loop() {

  if(mySerial.available()>0){

  mySerial.println(mySerial.read());

  }


  }
Setting it up
Copy this line to the _TinyISP_BuildOption.h
#define RELAY_SERIAL_ENABLED 1And change RELAY_KNOCK_BANG_ENABLED to 0
#define RELAY_KNOCK_BANG_ENABLED 0And uncomment this line in the TinyISP tab:
#include <SoftwareSerial.h>
Setup TinyISP options
Select between KnockBang and Serial Relay in the _TinyISP_BuildOption.h Tab
/*
   Put build options here.
   Available options can be found in TinyISP_SelectBuildOptions.h
   DO NOT MODIFY TinyISP_SelectBuildOptions.h
   */
// Use this option if you are programming a target with slowcloxk setting or Attiny13
//   #define PROGRAMMER_SPI_CLOCK SLOW
//Set to 1 if using KnockBang and comment out #include <SoftwareSerial.h> in TinyISP
   #define RELAY_KNOCK_BANG_ENABLED 0
//Set to 1 if using Serial Relay, and uncomment #include <SoftwareSerial.h> in TinyISP
   //Transmit on Arduino is A0
   #define RELAY_SERIAL_ENABLED  1
//Set to 1 if using TinyTuner2

   //Tuning signal pin 3 on UNO, connect to xtal2 on target
   #define TUNING_SIGNAL_ENABLED  1
For more info on TinyTuner2 see:this
For more info on TinyISP see: http://arduino.cc/forum/index.php/topic,123388.15.html
Newer Core for ATTiny13 and knockbang
Another guide: Here
Credits:
The Tiny core and TinyISP are developed and maintained by Coding Badly