ESP8266
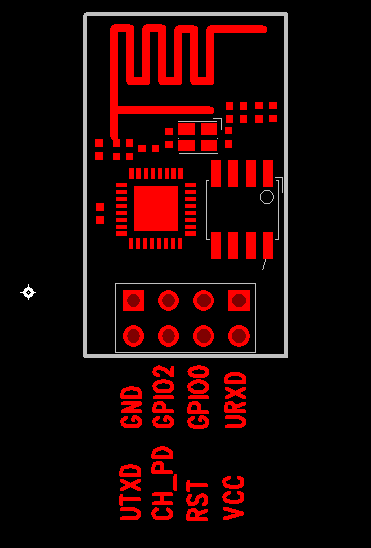
Theere are several versions of the esp8266. The picture above shows the esp8266-01. You can get boards with more pins broken out for example esp8266-03.
Connections:
Connect Ground and VCC to a 3.3V powersupply. The powersupply should be able to deliver at least 300 mA as the module use a lot of power when sending.
Don't use the 3.3V output from for example you Arduino it cannot deliver more than 100 mA, it will give you all sort of problems like restarts, lockups and so on.
Also connect CH_PD to +3.3V otherwise it won't work.
To communicate with the device you will need a 3.3V USB/serial converter. Note the chip is not 5V tolerant, so if you use a 5V converter you will need a levelconverter on the rx/tx lines. ESP8266-201: GPIO15 pulled down, GPIO2/GPIO0/RES/CH_PD pulled up. Firmware:
The modules comes with different versions of firmware, which also means that the baudrate can be anywhere betwenn 9600 and 115200.
I would recommend you update to the newest firmware, that way you can set the baudrate as you wish.
There are at least two kind of firmware at the moment.
' The modules ships with a version of AT firmware, which means that you communicate with the chip with AT commands
The other option is a lua based firmware which lets you program the chip in the programming language called lua.
Updating the firmware to the lua variant
You can get the latest lua-firmware here:
https://github.com/nodemcu/nodemcu-firmware
Navigate to the 512k-flash entry and click on the "RAW" button. This starts the download of the binary file that you should use to upload to the esp8266.
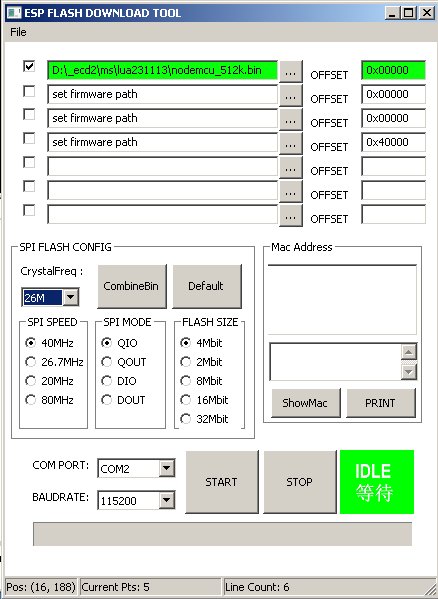
Next you will need a upload tool
I have used this Flash tool
You only have a few things to worry about:
Firmware path:
I downloaded the 512k-flash to:
D:\_ecd2\ms\lua231113\nodemcu_512k.binSet the Offset to 0x0000
Before you upload you must connect GPI00 to ground
So now you have CH_PD connected to 3.3V and GPIO0 pin to GROUND (LOW)
Next connect the module to you USB/serial converter.
Select the Com port you are using and you can press Start
Lua examples
Lua wiki
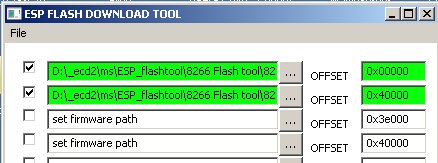
Updating the AT firmware:
If you prefer the AT firmware, the updating process is almost the same.
The only difference is that there might be more than one file to upload.
And again when uploading:
Before you upload you must connect GPI00 to ground
So now you have CH_PD connected to 3.3V and GPIO0 pin to GROUND (LOW)
In the picture below there are two files to upload, and note the different offsets.
A LUA webserver
This webserver runs on the esp8966 itself.
I have a model-01 and therefor I don't have acces to the ADC.
The idea is to use an ATtiny85 to do all the sensing stuff (it has 3 ADC pins) and send the result to the esp8266 via serial.
In lua you can set a variable like this:
t=56
And you can see the value like this:
print(t)
This is what I use here: the t85 simply change the value of t, which in turn are shown on the webserver.
if(t==nil) then
  t=12
end
srv=net.createServer(net.TCP) srv:listen(80,function(conn)
    conn:on("receive",function(conn,payload) print(payload)
    conn:send("HTTP/1.1 200 OK\n\n")
    conn:send("<html><body>")
    conn:send("<h1>Erni's ESP8266</h1><BR>")
    conn:send("TEMP : " .. t .. "<BR>")
    conn:send("NODE.HEAP : " .. node.heap() .. "<BR>")
    conn:send("TMR.NOW : " .. tmr.now() .. "<BR>")
    conn:send("</html></body>")
    conn:on("sent",function(conn) conn:close() end)
  end)
end)
The sketch running on ATtiny85
unsigned int count=0;

void setup() {

  Serial.begin(9600);
}

void loop() {
  Serial.print("t=");
  Serial.println(count);
  count++;
  delay(5000);
}
electrodragon.com
Arduino core